
Our 10-Step Animated Storytelling System!
Kids are excited to participate in the media revolution in which we find ourselves. It animates their souls!
Links: Stop Motion Studio Pro app • iStopMotion app • Manfrotto Mount Site • Table Top Options
The 10 Step Blueprint:
Step 1. Brainstorm an interesting character with a problem to solve.
Step 2. Stick-figure Storyboard
Step 3. Brainstorm Dialogue
Step 4. Utensils and Ingredients
Step 5. Sizing, Timing, and Layout (S.L.T.)
Step 6. Organize Props
Step 7. Animate
Step 8. Dialogue Part 2
Step 9. Voice overs (VO) & Sound Design
Step 10. Share or Exhibit
Step 1: Inventing A Story
Our biggest secret?
Invent a compelling story.
A basic character with an almost unsolvable problem is a riveting story idea.
Once agreed upon, it will become the engine of productivity, teamwork, and excitement.
How?
Throw a lot of spaghetti at the wall!
Make three columns on a piece of paper, with each story element at the top:
Character, Setting, Problem.

Take 15 minutes to brainstorm at least two dozen ideas. Mix it up. Be bizarre! The more ludicrous the idea the better.
Vote for your favorite.
Don't invent the solution to the problem yet, that will come later.
For now, decide on an interesting character with a big-fat-juicy problem.
Got it?
Make a central character and give it issues!
If you can agree on an interesting story starter, the animation will almost make itself!
Step 2: Stick Figure Storyboard

This storyboard is about a remote control, the main character, whose problem is that it falls under sofa cushions.
Use basic non-artistic sketches of scene ideas.
Just 10 scenes.
Sketch an opening scene and ask, "What happens next?" Then quick-sketch that idea in scene 2.
Then ask, "What happens next?"
Rinse and repeat, with the goal of solving the problem by scene 10.
Notice the letters L, M, and C.U. above each scene?
Long shot, Medium shot, or Close-Up.
Think of these camera angles as a character in your movie.
How the camera “acts” is as powerful as how your character acts.

Long shots are used to show settings or size differences. (Note: Young storyboarders will sketch out their entire story in Long shots if left to their own devices. Framing scenes with Medium shots and Close-ups will not come naturally.)

Medium Shots are great for character speaking scenes, costume display, and gestures!

Close-ups are great for emotional reactions, small objects and small details.
Step 3. Brainstorm Dialogue

Time for more brainstorming!
Generate a random list of phrases and dialogue ideas your main character might use during the movie.
A remote control is the main character in our example. We brainstormed a list of T.V. terms, button language, and sofa nonsense.
Use puns, idioms, and word play.
Have FUN, and then set it aside.
We will revisit these ideas during Step 8.
Step 4. Utensils and Ingredients

Cut-paper animation is the fastest, easiest way to make an original animation. Markers, pencils, crayons, paper, tape and scissors are all you need to bring entire creative worlds to life.

Legos, poseable toys, upright claymation, and 3D computer animation might come later, but for now, trust us - flat paper on a table top trumps other mediums for speed, ease of use, originality, and group input.
Step 5. Sizing, Timing, and Layout (S.L.T.)
Prep your scenes for animation.
Sizing

We like to work with 8.5" X 11" landscape oriented construction paper. This is a great size for animating on a standard-height table or desk. You can work at a larger size, but someone might fall from a wobbly chair they are standing on to look into the tablet.
So all your props and scene elements will need to be sized to fit in an 8.5"X11” screen.

The Long shot here is being composed on 8.5" X 11" black construction paper, with the non-animated props being “locked down" with loops of masking tape.
Don't use glue! It is too permanent. We might want to reuse props in other scenes.
Your movie has Long, Medium, and Close-Up scenes, but the screen size is a constant 8.5 X 11".
Using tape allows for mistakes and repositioning.

Here is a sizing guide to help young filmmakers estimate how big they’ll have to create their character for a Close-up version of the face...

Create a Medium Shot size template, and a Long shot sized template so the character is small enough to fit in a 8.5'x11” frame.
Getting the size right is one of the biggest challenges in this process. So take time to think this through with your young filmmakers.
The Layout (Cinematography)

Use the Rule of Thirds as a guide for composing a scene.
When two characters share the scene, put one on the right 1/3 and one on the left 1/3. Arrange the ground or a floor on the bottom 1/3 of the scene. This way your characters have something to stand on.

Encourage students to notice how their favorite shows use this concept. Cinematography and scene composition in most screen-based media relies on the Rule of Thirds for a basic compositional starting point. (Most apps have a function which overlays a Rule of Thirds grid on a device's screen)
Timing

Hypothesize the time duration of each scene and predict how many pictures the animation may require based on a 15 F.P.S. frame rate.
Stand up and physically act out each scene! This movie has never been made before - by anyone. Let's predict how long it takes to perform by...performing it!
This is a great estimation exercise. The time estimations are usually way off, until someone physically acts out the scene with a stop watch.
If a scene takes 6 seconds to act out, and we work at 15 frames per second, it will take 90 pictures to animate this scene: 6sec X 15 fps = 90 pictures.
Do the math. Plan the motion. Time it out.

Do this for every scene. We believe, in some strange osmosis-kind-of-way, that acting out the scene translates to better animation skill acquisition. New animators will absorb the story kinesthetically by acting it out.
Our experience is that new animators work too fast, draw too small and haven't a clue the timing of scwnwa oe about placement of props.
Use th S. L. T. acronym to remind them to take time planning out the size, the layout and time signature of each scene.
Step 6. Organize Props
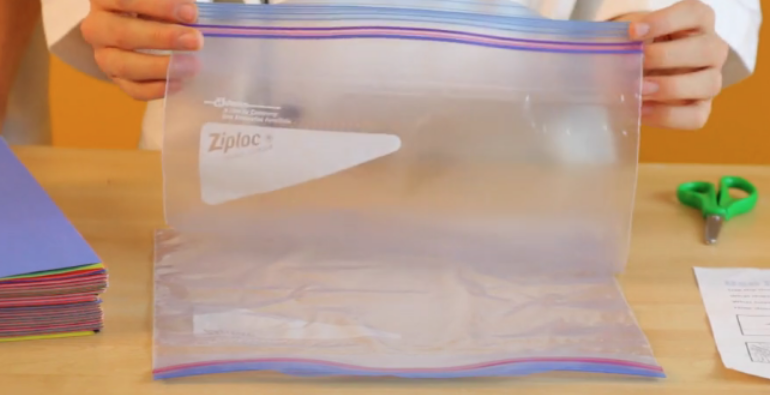
Working in cut paper creates a lot of props. It makes a big difference to organize the scenes into baggies when you finish creating them.

Then when it comes time to animate each scene, empty the scene's contents from the baggie onto the table. Organize the props and Viola'!
Ready to go!

Step 7. Animate Each Scene
You should have baggies filled with props for all your scenes, and a storyboard to guide your plan.
Animate one scene at a time, in the order dictated by your storyboard. This will save you time in the editing phase.
Animate all 10 scenes. The time to animate it all comes in at 2-3 hours.
We've split this process up in many workshop formats: 26 sessions, 12 sessions, 6 sessions, or 1 day sessions.
Bottom line, get everything ready to be animated, then animate it one scene at a time, whatever your time constraints.

Step 8. Dialogue Part 2
Remember that list of word play, puns, idioms, and acronyms from Step 3? This list has incubated and stewed for some time.
Note which scenes on your storyboard have opportunities for speaking parts.
Use your original ideas and come up with some new ideas as well.
We will be using this list for Step 9 when we do the actual VO. (Voice Overs)
We do our final dialogue writing AFTER the scenes are animated - we know our story much better.
These dialogue ideas are the life blood of short animation.
Beautiful animation can be dragged down by poor dialogue, but poor animation can be saved by voice acting when the words are cleverly chosen.
Step 9. Editing, VO, and Sound Design

An editing app or software is required for this step. Apple's iMovie, Google's WeVideo, and Adobe Premiere Clip are good solutions.
Import your silent animated scenes into the editing app.
1. Do a voice pass first. Go through your entire movie and record all the VO's first. Cut, copy and paste the mouth speaking animated loops to match the VO’s.
Once the voices are done, most of the timing issues are taken care of.
2. Record the sound effects (SFX) in another "pass". Our favorite sound effects tools are kid's mouths and a piece of paper. We use our mouths for 90% percent of our SFX.
3. Do the music "pass" last. We often encourage kids to sing their own scores, or you can use garageband or a favorite sound app to mix the music.
Following this "pass" method is a great way to stay organized and save time during post-production.
Post-production is by far the most rewarding phase of making a movie. Synching voices to characters and creating SFX for the action creates a buzz of energy difficult to describe until you go through the process.
Step 10. Exhibit and Share

Even though we may not be in groups for a while, when we get back to normal - exhibit with passion and style! It will change lives.
It is our experience that the more public the screening, the more transformative the outcome.
If you don't have a school auditorium or local screen willing to show your work, celebrate the world premiere of these animations on social media, Youtube, or on a smart board in class or - at family gatherings...where ever you can.
Do not underestimate this step.
Public screenings reprograms kid's sense of themselves as a digital citizen and a participant in their media making culture.
That’s It! Now You Know
Following these 10 steps can guide young media enthusiasts in the process of making a meaningful animated story from scratch - without any prior experience.
Please send us a link to any of your finished masterpieces, and we'll share it with the world!
Bon Animate!
The Animation Chefs Team

All of the steps and worksheets above are modeled by the Animation Chefs in Animating Kids!
Benefits of Subscribing To Animating Kids!
Over 140 videos for every step of the process
Worksheets for all steps
Professional Development and Training Videos
Streaming Advertisement Free 24/7
Multiple Device Logins Per Account to Accommodate Distance/Remote Learning
Customer Service By Live Humans
More Information at info@animatingkids.com
Animating Kids / Animation Chefs © 2009-2021 JS Productions